
How to Draw a Female Nose
44,994
- staff_illustrator15
- June 12, 2021 (Added)
- 0 (Comments)
It is high time for you to be aware of the simple and peculiar steps on how to draw a female nose. The most seen part of the nose is the basic facial parts showing the nostrils. The shape is being det...
Category:

Step 1 - Start by drawing a tall vertical line connected to two long horizontal lines that stretch across the page. These construction lines help you plan the space so the nose stays in balance.

Step 2 - Add two level strokes across the middle of your box to divide the space into smaller rows. These construction lines make it easier to see where to place each part of the nose so the proportion stays balanced.

Step 3 - Draw a leaning line that connects the middle sections and add a tiny round shape at the bottom. This first part of the nose bridge helps you find the right proportion for the rest of the face.

Step 4 - Place a tiny curved mark next to the circle and a short line underneath to form the base. Adding these small details helps define the nostril and gives the nose more depth.

Step 5 - Sketch a long upright curve with a tiny round shape at the bottom to start the front view. Placing this construction line next to the side profile helps you keep the same height for both drawings.

Step 6 - Add a rounded shape and a few short bending lines to the bottom of the bridge. These marks create the nostril and help give the front view more depth.

Step 7 - Draw a pair of vertical lines and a tiny round shape to the right of your other sketches. These new marks act as a construction line to help you position the bridge and tip from a different angle.

Step 8 - Place a little round shape between two outward-bending lines on the lowest guide. Using this construction line helps you map out the tip and nostrils from a looking-up angle.

Step 9 - Sketch a pair of straight lines and two tiny hooks around the bottom circle to finish the front-facing nose. Adding these marks helps you keep the symmetry between the bridge and the nostrils.

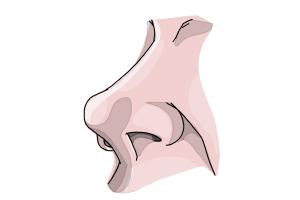
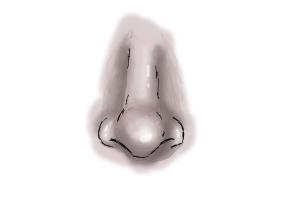
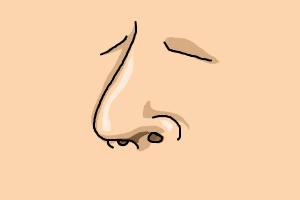
Step 10 - Go over your favorite lines with a darker stroke to define the bridge and nostrils for each angle. Darkening the final contour helps show the clear shape of the female nose against the lighter guides.

Step 11 - Rub away the faint guide shapes and horizontal bars until only your dark outlines remain. Removing these extra marks creates a clean finish and highlights the final contour of each nose.

Step 12 - Draw the bridge and nostrils for each angle using smooth curves to show how the nose turns. Placing these features between the lines helps maintain the same proportion for every view.

Step 13 - Trace over your guide shapes with smooth red lines to define the bridge and the rounded nostrils. Using these marks over the horizontal bars ensures each view maintains the same proportion.

Step 14 - Go over your favorite lines with a darker pen or pencil to finish the nose shapes. Adding dark shading inside the openings creates depth and makes the features look solid.

Step 15 - Use light, sketchy strokes to fill in the areas around the bridge and the base of each nose. This extra shading creates depth by showing how light and shadow hit the curved surfaces.
Suggestions
How to Draw a Nose Easy
by staff_illustrator15
34,299 views
34,299 views

How to Draw Female Lips
by staff_illustrator14
142,334 views
142,334 views

How to Draw Female Superheroes
by staff_illustrator15
294,629 views
294,629 views
How to Draw a Nose Step by Step
by staff_illustrator14
35,968 views
35,968 views

How to Draw a Female Face
by staff_illustrator14
65,405 views
65,405 views
How to Draw a Cartoon Nose
by staff_illustrator13
33,682 views
33,682 views

How to Draw a Cartoon Nose (Ver 2)
by staff_illustrator13
40,613 views
40,613 views

How to Draw Female Body
by staff_illustrator14
55,575 views
55,575 views
How to Draw Female Accessories
by staff_illustrator9
13,171 views
13,171 views

How to Draw Manga Style Female Faces
by staff_illustrator7
15,793 views
15,793 views
